I adore handmade cold process soap. My first ever blog post was about soap (see it here) and it is a way of creating something truly luxurious that you can use every day.
Most of the soap you buy in shops is overly processed detergent rather than the glycerine rich skin-feast you can make for yourself. You can make it to your own particular dermatological requirements and, of course, you will always know exactly what is going on to your skin.
Although soap making is completely do-able at home you have to respect the fact that the magic ingredient, sodium hydroxide, is dangerous. Don't attempt to make real soap with young children around and always follow the golden rule: DO NOT POUR THE WATER ON TO THE SODIUM HYDROXIDE. Soap making is part art, part science and part magic. Feel the creative flow, dress like a lab technician and follow the spell recipe to the letter!
There are plenty of books of recipes out there and once you know the sciencey bit you can actually create your own very easily!
Soap is created when fat/acid molecules collide with an alkali/sodium hydroxide. The resulting (al)chemical process is called 'saponification'. Each different type of oil needs a certain amount of sodium hydroxide to 'saponify'. Too little and the resulting soap is too soft and will go rancid easily. Too much and your soap will be harsh and irritating. But fear not! There are plenty of recipes out there on the internet and in books. And if you do want to make your very own special recipe you calculate the correct amount of sodium hydroxide using the power of maths (hoorah!) or a lye calculator (try this one from brambleberry.com or soapcalc).
It's possible to spend many a happy hour researching the properties of all the different soaping oils and then many more deciding what additives will enhance your soap and make the kind of bar you want. You can add shea butter, honey or pumice. You can add natural or artificial colours, synthetic fragrances or pure essential oils. Whatever you want from your soap you'll need to research it. Certain colours won't remain true and certain essential oils will affect the colour or texture of your finished product. Trust me, that's all part of the fun!
The following recipe is one of my favourites, It's from
This is an excellent book by a UK soaper. I wholeheartedly recommend it although there is one teensy tiny printing error - it tells you to always pour the water onto your sodium hydroxide. NEVER do this! As misprints go, it's a doozy. It also contains a lot of recipes using lard. As a vegetarian it made me feel a bit queasy to be honest but there are plenty of lard-free recipes and by her second book (Gourmet Soaps Made Easy) she'd become a vegetarian herself and ditched the lard entirely. On the plus side, lard is cheap and easily available to UK soapers.
This is Melinda's basic recipe, minus her choice of fragrance, colour and texture. It makes a hard, long lasting bar that is quick to make because the beeswax speeds up 'trace'.
INGREDIENTS
283g distilled or
spring water
113g sodium hydroxide (Caustic Soda) –
Boots sell it. *since I wrote this post Boots seem to have changed their sodium hydroxide to a weaker formula. Buy it from soap suppliers to be sure it's strong enough.
849g olive oil
57g beeswax - pellets are easiest by far, or if you're lucky enough to have a piece of raw beeswax grate it or you'll be here forever.
up to 45ml (3 tablespoons)
essential oil(s) - I've used lavender (2 tblsp) and geranium (1tblsp) because they're my favourite! This is my personal addition to her recipe - she tends to use smaller amounts of essential oils.
EQUIPMENT
2 heavy duty plastic or
glass jugs
electronic scales with
tare function
goggles
rubber gloves
2 sugar thermometers
Melting pot / large
saucepan
soap mould – silicone
or tuppaware box or lined (greaseproof paper) wooden mould, no metal!
Plastic, silicone or
wooden spoons / spatulas
rubber gloves
METHOD
WEIGH 375g water
in one jug.
weigh 143g sodium
hydroxide in second jug or small plastic box.
Weigh oils
directly into the saucepan.
Weigh out your essential oils into a glass and put clingfilm over the top to stop
evaporation.
Pour the sodium
hydroxide into the water – slowly, stirring all the time with
wooden or silicone spoon. NEVER PUT WATER ONTO Sodium Hydroxide! It will bubble up
like a volcano! The mixture will give off nasty fumes so avoid
breathing in – do this in ventilated area.
When dissolved put
cling film over and set safely aside safely away from cats or kids.
Melt the oils over a
low heat – you're not trying to heat them. When only a few small lumps remain you can turn heat off and the rest will melt.
Prepare your mould(s). Silicone moulds should be alright as they are but wooden moulds will need to be lined with grease proof paper.
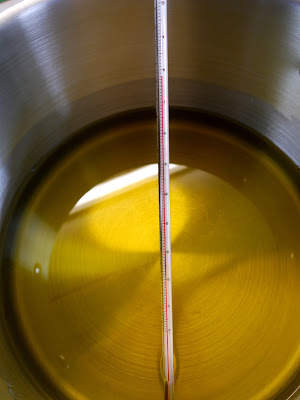
Use the sugar
thermometers to find when the temperature of both Sodium Hydroxide solution (lye) and oils cool
down to between 40-45c.
I use long glass laboratory thermometers so
I can just leave them in. If temperature range is different is
easiest to either heat up oils a smidgen or cool them down by putting
the pan in a sink of cold water. They don't have to be exactly the
same temperature but within this range.
Slowly pour lye
solution into the melted oils (off heat) and stir briskly in.
Best method is
to use a cheap stick blender now as can save you hours of stirring!
A few blasts with the blender can make trace happen very quickly, especially with this beeswax recipe. Don't go mad with the blender or it might become so thick you'll have to scoop it out into the mould - I speak from personal experience! If you do get over excited the soap will still be usable but it may not be as attractive when cut into bars, or, as happened to me, it set into layers as I was putting it in the mould so when it was ready to use weeks later the bars had a 'fault line' and broke in half. I still used it but it wasn't much good as a gift.
Trace is when the soap mix changes colour and thickens. Like thick
custard, if you dribble a bit of mix onto the surface it leaves a
'trace' – geddit?!
Give a good (but
quick) stir for good measure then add essential oils and any colours
– cocoa powder is good – then stir them in well. Quickly pour
into moulds and use a spatula to scrape all soap mix out – it makes
the pot easier to clean as well as avoiding waste.
If your mould doesn't
have a lid cover it in a layer of cling film and be careful to keep it
upright. Wrap in blankets or old duvet for 24 hours to harden.
Wearing rubber
gloves (as is still caustic!) unmould after 24 hours and cut into
bars. Don't leave any longer as it will be very hard to get out of
mould and becomes harder to cut! In other recipes using softer oils it's often a good idea to leave it for 48 hours. The first time I made this recipe I did and it was nearly impossible to cut. I use cheese wire or a sharp kitchen knife on a plastic chopping board.
Leave for 4-6 weeks to cure,
preferably somewhere warmish and circulating air will help the bars to
harden.
Test if is ready
to use by touching tip of your tongue on a bar. If it tastes like
soap it's ready – if it's 'fizzy' leave a bit longer.
I test all soap on myself before I distribute it among friends, family and my linen draws :).
UK soapers will find it easiest to find small quantities of soaping ingredients in supermarkets or on ebay where kind individuals, possibly subsidising their own soap habit, can be found selling usable quantities of things like shea butter or cocoa butter. Other suppliers I have used are:
Enjoy!